|
|
|
Aladdin eToken R2 and data encryption
|
|
SCard SOFT
|
|
|
LOOK INTO YOUR CARD
|
|
| | |
| | |
| | |
| | |
|
How to use USB token Aladdin eToken R2
for the data encryption
|
|
|
| | |
|
|
|
| | |
|
|
ABOUT AUTHOR
|
|
Education:
|
High, from the FAVT
of Odessa State Polytechnic University,
system programmer
|
|
|
Occupation:
|
Software developer
|
|
|
Interests:
|
Programming, electronics, videoediting
|
|
|
|
|
|
|
| | |
|
Introduction
|
|
| | |
|
A lots of token's models with different functionality are exists now.
In this article I want to describe about token "Aladdin eToken R2", or more precisely about one of its functions: 120-bit DESX-encryption.
Drivers of this token gives standard PC/SC interface; therefore in examples APDU commands will be given.
|
|
| | |
|
First stage - personalization
|
|
| | |
|
At first we should prepare token for the work.
The encryption function examined by us is impossible without the encryption key. I will not discuss in this article, how to generate that key (random sequence of bytes). I will simply note that his length must be equal to 16 bytes.
For an example let's take next array of bytes as encryption key:
key = {'q','w','e','r','t','y','u','i','o','p','a','s','d','f','g','h'}
key HEX = {71 77 65 72 74 79 75 69 6F 70 61 73 64 66 67 68}
This key we must write in token. Moreover for guaranteeing the higher level of security we will create keyfile in token, which can be accessed only after entering PIN-code. Another name of token preparation (or initializing) process is "token personalization". It must execute one time.
Break our token personalization process into 4 steps:
- Logon to token (command Verify);
- Creating file for our encryption key (command CreateFile);
- Set created file active (command SelectFile);
- Write encryption key (generated before) to file (command WriteKey).
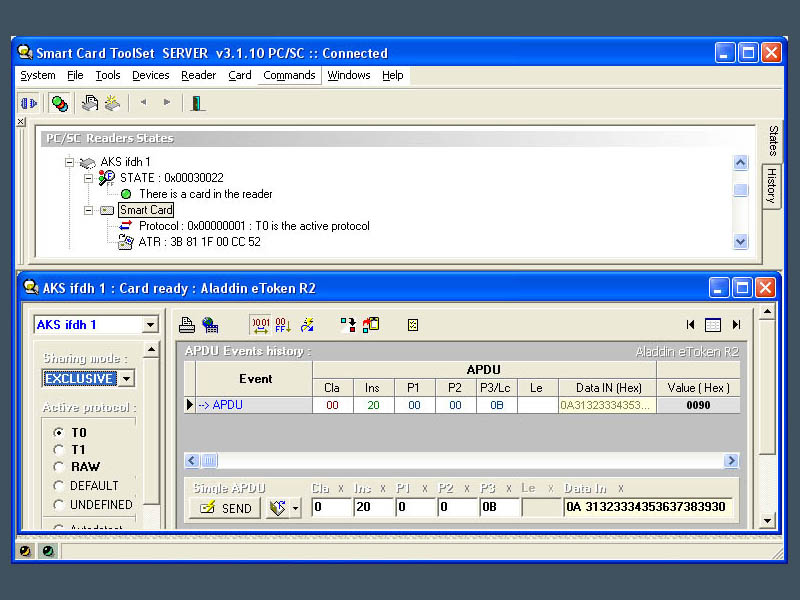
Verify.
Produce logon to token by entering PIN-code. In this case token is transferred into 2-factor state. On factory PIN-code in eToken R2 is set to "1234567890" (factory default). APDU-command of PIN presentation looks like as:
|
Cla
|
Ins
|
P1
|
P2
|
P3/Lc
|
Le
|
Data In
|
|
00
|
20
|
00
|
00
|
0B
|
|
0A 31323334353637383930
|
|
where:
P3 - data block length,
0A - PIN-code length,
31323334353637383930 - the PIN-code '1234567890'
|
|
| | |
|
|
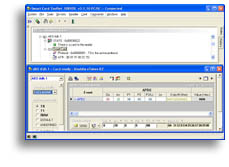
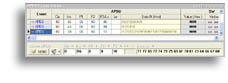
We will use "SmartCart ToolSet SERVER" program for the test executing of commands. It's look like this:
|
|
| | | |
|
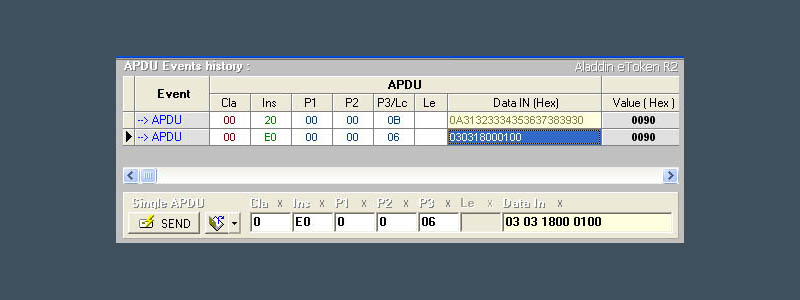
CreateFile.
After successful logon we create file of type KF (keyfile - special type of file in the token file system, data which cannot be read) and, for example, with identifier 0x0001. APDU-command it will take the form:
|
Cla
|
Ins
|
P1
|
P2
|
P3/Lc
|
Le
|
Data In
|
|
00
|
E0
|
00
|
00
|
06
|
|
03 03 1800 0100
|
|
where:
P3 - data length,
03 - type of file, in this case is KF,
03 - access factor, 2-factor secret - accessed only after entering PIN-code.
1800 - file length 24 bytes (00 18) - moreover, key length is 16 bytes, but filesize must be 24 bytes, because 8 bytes needs for internal use.
0100 - file identifier in the file system of token 0001 (high and low bytes swapped like in previous field).
|
|
| | |
|
|
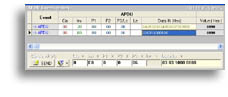
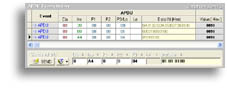
View of the reader window after the command execution:
|
|
| | | |
|
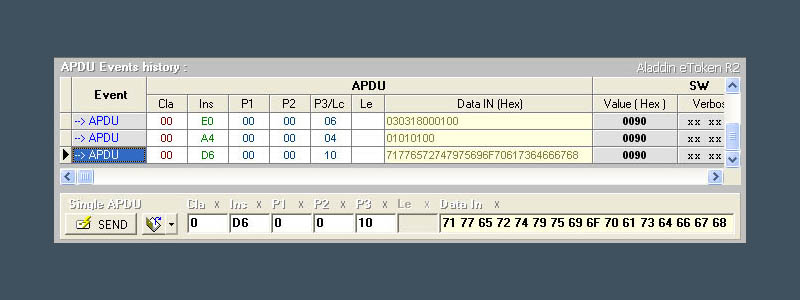
SelectFile.
Thus, file-container for storage DESX-key is created; however, before write data into him it must be made active. We will use command SelectFile:
|
Cla
|
Ins
|
P1
|
P2
|
P3/Lc
|
Le
|
Data In
|
|
00
|
A4
|
00
|
00
|
04
|
|
01 01 0100
|
|
where:
P3 - data length,
Fields in data block:
first byte 01 - Reftype in file system, 01 - relative,
second byte 01 - number of components in path, for relative reftype always equal to 01,
0100 - file identifier (0001).
|
|
| | |
|
|
View of the reader window after the command execution:
|
|
| | | |
|
WriteKey.
File for storage encryption key is created, set on active, encryption key is generated, it are necessary to write it in the created file and token will be ready to work, that we will make by the following command:
|
Cla
|
Ins
|
P1
|
P2
|
P3/Lc
|
Le
|
Data In
|
|
00
|
�6
|
00
|
00
|
10
|
|
71 77 65 72 74 79 75 69 6F 70 61 73 64 66 67 68
|
|
where:
P3 - data length,
and data field consist our encryption key.
|
|
| | |
|
|
View of the reader window after the command execution:
|
|
| | | |
|
|
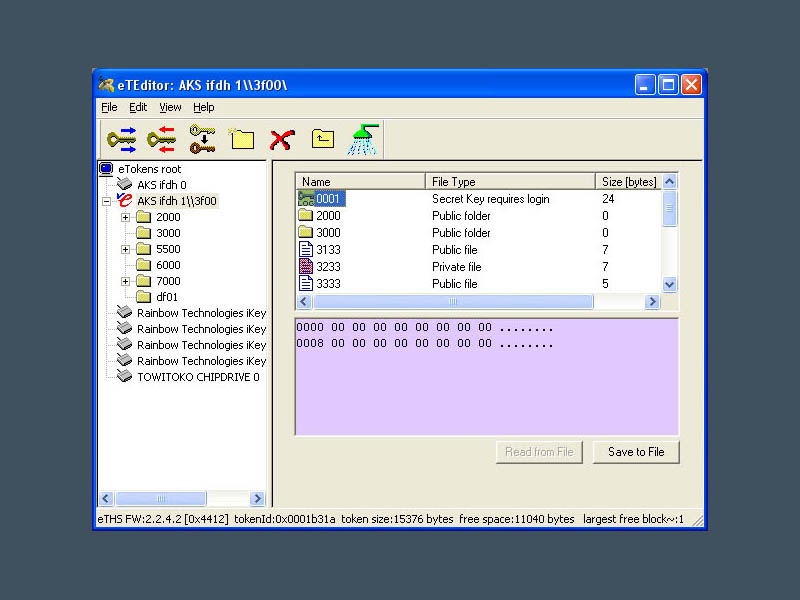
We can use good tool eTEdit.exe from Aladdin SDK for browsing file system tree on token.
It is interesting to look that we obtained as a result, and it appears thus:
|

|
| | | |
|
The first stage is completed, we are ready for use token.
|
|
| | |
|
Second stage - work with token (use encryption function)
|
|
| | |
|
Now we have token with build in 120-bit DESX encryption algorithm. Token already have encryption key generated by us.And we have external confidential info, which we want to hide from the outside eyes.
Let us again paint the steps, which must be executed for achievement of our general goal - data encryption/decryption:
- Logon to token (command Verify);
- Set on active our keyfile (command SelectFile);
- Perform encrypt/decrypt operation (command DESX_Operation).
The first two commands has already been used by us in the first stage - "token personalization"; therefore let us pass immediately to the third - last and primary.
|
|
| | |
|
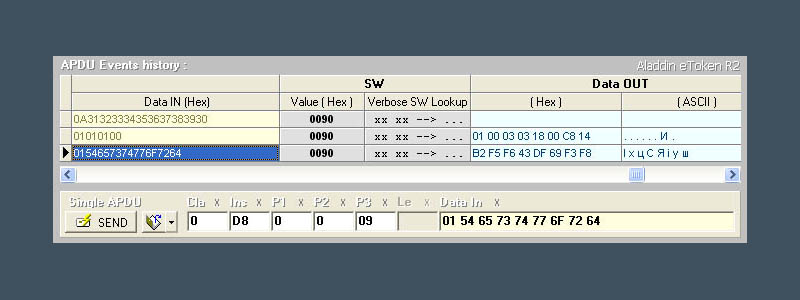
DESX_Operation.
This command is intended both for the encryption and decryption of external data. It has the following format:
|
Cla
|
Ins
|
P1
|
P2
|
P3/Lc
|
Le
|
Data In
|
|
00
|
D8
|
00
|
00
|
09
|
|
01 buff[8]
|
|
where:
P3 - data length;
first byte in data - operation flags, if bit 1 = "1", than encryption, else decryption;
Buff[8] - 8-byte data buffer, which needs to encrypt/decrypt. Result of operation is also placed into this buffer.
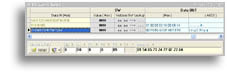
Let's verify how to work this command on example. Once again we shall take advantage of the program Smart Card ToolSet.
Input parameters:
DESX-key, generated during the first stage; key = {'q','w','e','r','t','y','u','i','o','p','a','s','d','f','g','h'};
data for encryption: for simplicity let's take string "Testword" (54 65 73 74 77 6F 72 64) Hex.
|
|
| | |
|
|
After performing DESX_Operation command (encryption) our test string "Testword" is converted into array of bytes, which one can see well on on following screenshot:
|
|
| | | |
|
If it is necessary to perform the operations above the data of larger size, then realizes this by the call of command "Desx_operation" in the cycle, each time displacing on the buffer to 8 bytes.
It is also necessary to remember that algorithm DESX requires at the entrance the blocks of data with the length of multiple by the 8(eighth), and if it is less - to supplement with the missing bytes to the necessary length (usually FF).
|
|
| | |
|
Conclusion
|
|
| | |
|
In the conclusion one ought to note that the sphere of application of electronic devices (USB tokens, smartcards) is very extensive. In the majority of the cases they are used for authentification or storage of secret data.
The method the "concealment of its confidential data proposed" is sufficiently reliable. By this we have mechanism of two-level protection "must have, must know". I.e. for the decryption of data it is necessary to satisfy two conditions: to have token and to know the PIN-code.
Your observations apropos of this article direct to me to e-mail, I will be glad to contact.
|
|
| | |
|
|
|
| | |
|
|
|
|
© 2017-2021 DIGITAL MIND SYSTEMS LTD.
© 2002-2017 SCardSOFT
|
|
|
|
|
|
|
|
|
SCardX Easy v2.1
Smart Cards ActiveX
Add smart cards to your web site or to your applications easy!
More ...

|
|
|
|
|
|
|
|
|
|
Smart Card ToolSet
v3.5 PRO
(release 38)
Discover any ISO-7816 smart card on the APDU level easy!
More ...
|
|
|
|
|
|
|
|
|
|
|